Keeping your PC fan clean is crucial for the optimal performance of your computer. A dusty or clogged fan can lead to overheating, reduced performance, and even hardware damage. In this guide, we will walk you through the steps to clean your PC fan efficiently and safely.
Why Clean Your PC Fan?
Over time, dust and debris accumulate on your PC fan, which hinders its ability to cool your components effectively. Regular cleaning helps:
- Prevent overheating
- Improve airflow
- Extend the lifespan of your components
- Reduce noise levels
- Maintain optimal performance
Required Tools
Before you start, gather the necessary tools:
- Compressed air canister
- Soft brush
- Small screwdriver
- Isopropyl alcohol (optional)
- Microfiber cloth
Step-by-Step Guide to Clean Your PC Fan
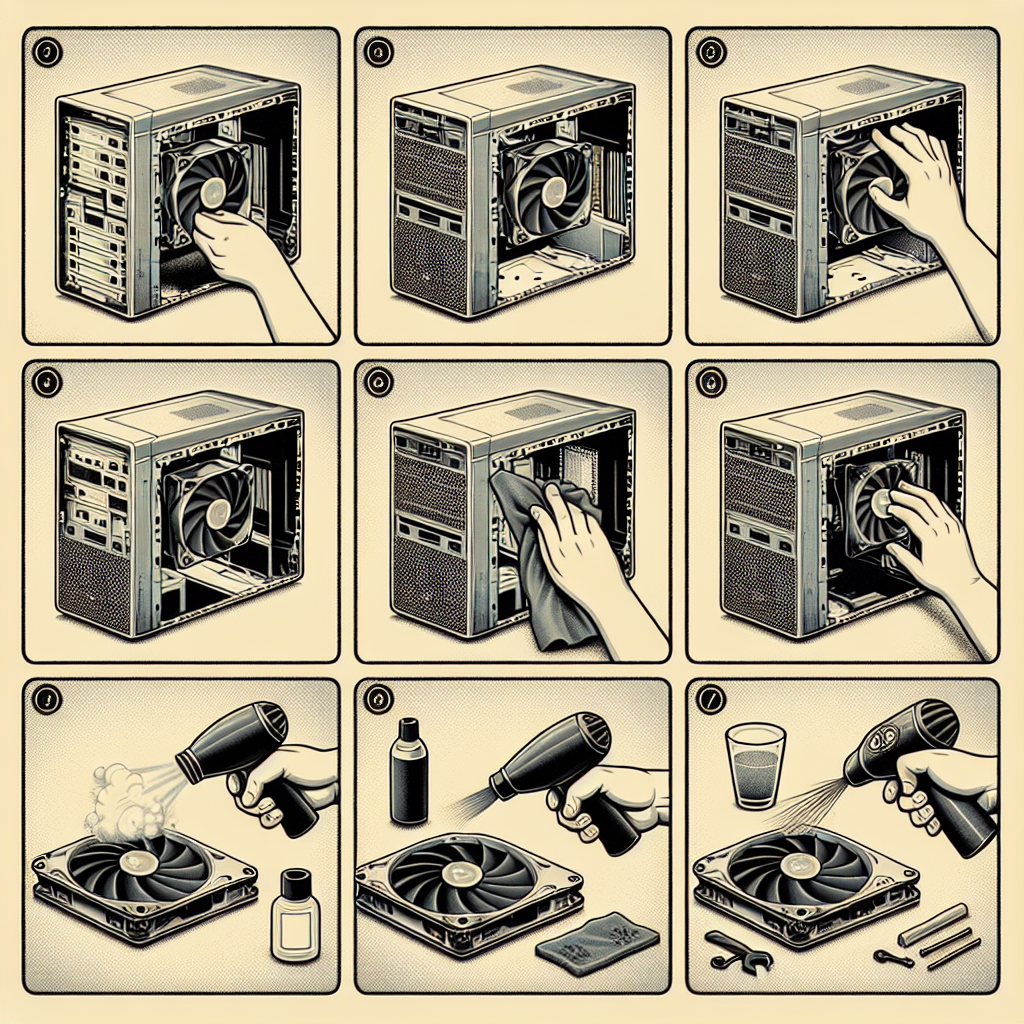
1. Power Off and Unplug Your PC
Always ensure your computer is powered off and unplugged from the electrical outlet before beginning any cleaning or maintenance work. This precaution prevents any electrical hazards and protects your hardware.
2. Open Your PC Case
Using a screwdriver, open your PC case to access the internal components. Refer to your PC’s manual for specific instructions on opening the case.
3. Locate the Fan
Once the case is open, locate the fan that needs cleaning. Most PCs have multiple fans, including the CPU fan, GPU fan, and case fans. Identify the one(s) that requires attention.
4. Use Compressed Air
Hold the fan with one hand to prevent it from spinning. Use the compressed air canister to blow away dust and debris. Make sure to blow the air in short bursts to avoid damaging the fan blades.
5. Brush Off Remaining Dust
Use a soft brush to gently remove any remaining dust particles from the fan blades and surrounding areas. Be cautious not to apply too much pressure to avoid bending the blades.
| Cleaning Steps | Description |
|---|---|
| Power Off and Unplug PC | Ensure safety before cleaning |
| Open PC Case | Access internal components |
| Locate the Fan | Identify the fan to clean |
| Use Compressed Air | Blow away debris |
| Brush Off Remaining Dust | Clean fan blades |
6. Clean with Isopropyl Alcohol (Optional)
If the fan is extremely dirty, dampen a microfiber cloth with isopropyl alcohol and gently wipe the fan blades. Isopropyl alcohol evaporates quickly and does not leave residue.
7. Reassemble Your PC
Once you have thoroughly cleaned the fan, carefully reassemble your PC case. Ensure all screws are securely tightened and cables are properly connected.
8. Power On and Test
Plug your PC back into the power outlet and turn it on. Check to ensure the fan is running smoothly and the noise levels are reduced. Monitor the temperatures using software like HWMonitor or SpeedFan to confirm that the cleaning has improved cooling performance.
Additional Tips
To keep your PC fan clean and maintain optimal performance, consider these additional tips:
- Clean your PC fan every 3-6 months
- Use dust filters on intake fans
- Keep your PC in a dust-free environment
- Avoid smoking near your computer
- Ensure proper ventilation and airflow
Conclusion
Cleaning your PC fan is a simple yet essential maintenance task that can significantly impact your computer’s performance and longevity. By following these steps, you can ensure your PC remains cool, quiet, and efficient. Remember to clean your PC fan regularly and adhere to best practices to keep your system running smoothly.